Frames/Stencils, continued
17. Stencil moisture content
Critical to a stencil's exposure capabilities as well as its on-press durability.
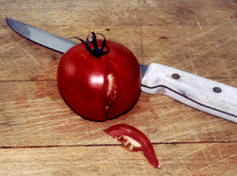
Many people think heat will help evaporation (which it can by expanding the air so it can hold more moisture), but heat is also the enemy of photo stencils. Heat can activate them (although not as well as ultra-violet light), and prematurely, at that. Fans, heat guns or (don't even think about it) running your stencil through the oven, dry the stencil to the touch, but the print quality suffers. The surface of the stencil is dry, but there's still water inside. Many will claim it's dry enough because it's dry to the touch. But we all know how dry, for example, a tomato is, even though it feels dry outside!
In the same manner as a juicy tomato only feels dry
on the outside, dry-to-the-touch does not an adequately dry stencil make.
Most stencils are based on polyvinyl acetate/polyvinyl alcohol resins. This is the same resin family that is the basis for a carpenter's wood glue. Read the instructions on the glue bottle and you will find "let dry over night" which means eight hours-but that still doesn't help; if the room is moist, the screen won't dry completely. If you're not equipped with instrumentation to accurately measure stencil moisture content, rely on a dry, dehumidified room (45 to 55 percent relative humidity, or Rh), thin (easier to dry) multiple coatings of emulsion, (as many as it takes to build up a good, smooth, gasket-like stencil), then dry them at least eight hours. In a small screen-drying room, a hygrometer (an inexpensive digital model from Radio Shack works well) will show you the change in relative humidity as you coat. In the morning, note the relative humidity, then watch it go up as you coat. As the dehumidifier attacks the moisture in the air, the Rh will come down again until it reaches your normal Rh. This is no guarantee that the screens are near 98 percent dry, but it is the best you can do. I use an emulsion with a high solids content so it drys faster and creates a thicker stencil with fewer face coats. Don't want to go to all this trouble? Use capillary film. It dries in less than 60 minutes in a dehumidified room and provides a stencil with manufactured-in consistency. Evaporation To get water out of a stencil, the water must evaporate. There are two rules to memorize about evaporation of water: 1) Water evaporates up. (Credit for this rule belongs to Mark Johnson, biologist turned screen printer.) This will help you remember which side of the screen should face up. Many people mistakenly dry capillary stencils with the polyester backing sheet up. This stops evaporation like an upside-down umbrella. 2) Water will evaporate only if there's more water in the stencil than there is in the air surrounding the stencil. (Credit for this rule belongs to Mother Nature.) Humidity is the amount of water molecules in the air. Our problem is water in the stencil. Mother Nature loves balance. When there's more moisture in a stencil than there is in the air, Mother Nature tries to equalize the difference between the two. Every science book you forgot about after high school had sections on equilibrium-now's the time to remember them. How fast equilibrium is achieved depends on how big a difference exists between the screen and the atmosphere surrounding it. Imagine locks in a canal when there's a big difference between water levels. The bigger the difference, yes, the faster the flow, but also the longer it takes for the levels to match. The best drying action happens when you put a stencil in very dry air. We could all move to the Arizona desert where they have low humidity all the time, but it wouldn't be practical for our customers and families. Instead, we need a way to dry the air in our screen-making rooms. If you develop (wash out) or reclaim your screens in the same room, you're spraying water into the air, raising the humidity. If your shop is near an ocean or lake, that large source of water is continually raising the humidity in your shop. To maintain an atmosphere of dry air, you'll have to find a way to contain the dry air you create, preventing leakage. Two solutions are: 1) Create a drying box. This is just a small room, like a closet. 2) Build a room dedicated to screen coating with positive-pressure air conditioning. Positive pressure pushes dust out of the room every time you open the door. The air-conditioned room is why so many people want to be screen makers. Air conditioning isn't just cooling air, but adjusting the temperature up or down, cleaning out fumes and odors, filtering out lint, dust and the like, circulating and ventilating the air, and adjusting the amount of moisture. We're used to air conditioning for human comfort, now it's time to think of our friend the stencil. Heat vs humidity If we have lots of dry air, we'll create an atmosphere that accelerates the process of evaporation (which dries the stencil); but sooner or later, because of the increased moisture in the air, evaporation will stop. There are two ways to change this situation: 1) Raise the temperature of the air which allows it to hold more water. But this can only be a temporary solution. Heat is fine to some extent because when you raise the air temperature it can hold more water. We can't keep raising the temperature of the air, though, and there's a limit to how much moisture it can hold, even if warmer. We can't let the stencil spend too much time at temperatures above 100°F or the sensitizer will react and harden, just as if it had been exposed to UV light. If it hardens in the screen room, you won't be able to expose it for a stencil. So if you do heat the air, change it as it gets saturated-but not too fast, or you'll spend too much money on electricity heating more air than you need. Almost every screen-print equipment manufacturer makes a drying box for stencils, but none of them (that I have seen) have any form of dehumidification. They're just cabinets with a heater. 2) Thus, suggestion number two is to dehumidify the air. The removal or reduction of moisture from the air is dehumidification. Air conditioners do it automatically. Dedicated dehumidifiers do it even better. Mr. Dehumidifier is the hardest working guy in screen making. Wherever stencils are drying, he should be there to collect those pesky water drops and get them out of the air, so the dry air can speed up evaporation. One of the drawbacks of using a dedicated dehumidifier is that they create heat as they work. When water evaporates to a gas, the change in physical state is always accompanied by the absorption of heat. The gas (water vapor) takes the heat with it. Evaporation cools the stencil but raises the temperature of the air because heat was released during the change. For this reason, an air-conditioned drying area is still a good idea. A positive flow of air keeps out dust, new air is fairly dry, filtered and, because we are dealing with temperature-sensitive materials, a controlled temperature (75°F to 85°F) is kinder to them. |
18. Exposure intensity
The power and frequency of the UV light source with which a stencil is exposed.
Metal halide, mercury vapor, pulse xenon and fluorescent are the most commonly available stencil-exposure light sources today, while carbon-arc lamps are also still in limited use. There are some traditional rivalries associated with the exposure light source, between those who hold varying opinions about the equally varied lamp types. One of two long-standing battles pits supporters of "point"-type light-source technologies against those who argue that fluorescent-tube arrays are adequate for screen exposure. There are also some side skirmishes within the "point-light" ranks involving UV spectral output. Each lamp type has different output frequency and power. These two factors combine to determine light intensity, and have a lot to do with how efficiently a stencil can be exposed. Each has its effect in the following ways: Output power. When lamps of the same type are compared (for instance, metal halide vs metal halide), the higher-wattage lamp will fully expose a given stencil in a shorter length of time than the one of lower wattage. For example, a 4,000-watt lamp provides twice the output power of a 2,000-watt lamp. Exposure time, then, with the former (all other variables being equal) will be half that of the latter. Output frequency. This factor has a direct affect on how a lamp stacks up in the "skirmish" described above. Ideally, the greatest lamp output should be in the UV frequency range to which the stencil material is most sensitive. However, all the lamp-types currently used for exposure produce output in not only the UV range, but also in the infrared (heat-producing) range and, of course, the visible light spectrum. It follows, then, that some of each lamp's output wattage is spent producing essentially useless (for exposure purposes) light and heat. But how much? That's the real issue. Two different lamps can be rated comparably in power (each is, say, 2,000 watts) yet, if most of one bulb's wattage goes toward output in the UV-light range, while the other bulb's wattage is heavily spent on output in the visible light range, the former will be more efficient than the atter at exposing stencils. Wattage alone, therefore, is an unreliable indicator of a lamp's true efficiency. To achieve the highest UV intensity, an exposure lamp must have not only high output power, but must also devote as much of its wattage as possible to producing UV-light. And not just any UV light, but UV light in the range to which a particular stencil's emulsion is most sensitive. If that is the case, it's fair to ask why one lamp type, or even one brand of lamp-the one which rates most efficient-isn't the only one used. The answer, of course, has to do with price. Generally, the more efficient lamps are more expensive, both in cost and power consumption. Having said all that, it's important to note that none of the above lamp types (no matter what wattage or UV output each generates) will fail to fully harden or expose a photostencil. But these factors can and do have a direct and significant effect on the minimum length of time required to produce an optimum exposure. (This, in turn, has an obvious impact on Variable 20: EXPOSURE DURATION, coming up.) The issue of lamp intensity gets more complicated, however. Choice of lamp type is only the most obvious way we may influence the variable of exposure intensity. Less apparent, but often a greater problem in practice, is the fact that lamp intensity is not a constant. Output tends to decline with use, no matter what lamp you choose. In other words, lamps gradually age, and this makes control of the intensity variable difficult without regular testing and/or additional equipment. |
19. Exposure distance
The importance of calculating the distance between your exposure source
and your stencil.
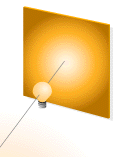
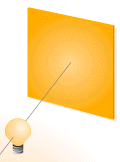
On the left side, the lamp is too close. There's a "hot spot"
in the center with heavy fall-off toward all edges. The result is a considerable
inconsistency in the amount of UV exposure from center to edge. Increasing
the distance of the lamp from the vacuum frame will improve the consistency
(though it won't ever make it uniform), but it greatly reduces UV intensity,
overall, at the stencil surface. This, we shall see, has major implications
for Variable 20: EXPOSURE DURATION.
At left, the exposure lamp is too close, resulting in a "hot" center and "cold" edges and corners; at right, exposure distance equal to the screen's corner-to-corner measurement provides good results.
The authorities tell us that setting a point-type light source at a distance from the stencil equal to the diagonal measurement (corner to corner) of the image area is a good compromise (at right, above). Though it doesn't optimize either intensity or consistency, it's generally considered to be the optimum balance between them. And-this is important-it represents a trade-off point where the range of intensity, high to low, is said to be small enough to "fit through" the typical "window" of stencil exposure latitude. Its exposure latitude is a stencil film or emulsion's built-in ability to tolerate a certain amount of difference between the high and low UV dosages, without exhibiting noticeable signs of under- or overexposure. The above, however, applies only to point-light sources, and here is where the point-light vs fluorescent-tube battle heats up. Manufacturers of fluorescent units argue that their multi-lamp arrays, placed close to the stencil surface, provide a more consistent exposure, by design, than can be had from any point-light source. Point-light people reply that, although this may be true, multi-lamp arrays tend to multiply the incidence of image undercutting (see Variable 10 and Variable 20, below). |
20. Exposure duration
The length of exposure required, balanced against the exposure distance
and intensity.
The time an exposure takes increases exponentially as lamp-to-stencil distance increases. For instance, if the distance doubles, the exposure must be 22, or four times as long. Distance and time become another pair of competitors in the durability vs image- quality game: The longer a stencil is exposed to UV light, the "harder" or more cross-linked it becomes. This is the key to stencil durability but, unfortunately, the longer the stencil is exposed, the greater is the loss of image resolution due to the much discussed phenomenon of undercutting (a.k.a. light scatter or halation). Undercutting occurs as light passing through the stencil tends to refract slightly-that is, it bends or scatters-around the edge of the stencil outline. Though light scatter is normally very small (assuming the image in the film emulsion is in direct contact with the stencil surface), its affect builds with time. Scattered light can harden stencil material inside the image outline, causing poor edge definition and even complete loss of fine details. The shorter the exposure, of course, the less undercutting can occur. However, if the exposure is too short, the stencil won't fully harden even where it's supposed to. The result is worse: premature stencil breakdown, low run durability and poor reclaimability. Therefore, the optimum exposure duration must strike an acceptable balance between the competing needs for durability and good image resolution. The way to determine optimum exposure? You could spend $400 on a test device called a radiometer. It reads the actual UV intensity at the screen's surface. With that reading, a little research and a little math, you could pinpoint the correct exposure. A less expensive but reliable and versatile tool is a test film called an exposure calculator. Other low-tech methods for evaluating stencil exposure vary with stencil type: In diazo-sensitized emulsion, a color change occurs when the emulsion is completely hardened. By evaluating the color changes of the test, the lowest exposure time that causes complete stencil hardening can be established. Photopolymer stencils do change color, but not at the point of polymerization. Exposure accuracy can be confirmed visually only by direct examination of resolution and definition with a 10X or better loupe (though this will not confirm full hardness or durability, but only indicate that overexposure has not occurred). |
21. Stencil processing
Washing out - or developing - the exposed stencil material.
Once the stencil is exposed, it is "developed" or processed, simply by washing out the unexposed portions with warm water. And even here, balance must be the goal. The higher the water pressure or temperature, the faster the stencil will wash out. Excessive water pressure and/or temperature may degrade stencil quality or durability. Here are some simple tips for maintaining the balance. Direct emulsions: High water temperature is not recommended. Heat causes the water to be more readily absorbed into the pores of the emulsion, requiring a lengthier dry time before the screen is press-ready. Wash-out works best between room and body temperature (70° to 98°). Capillary films: Less affected by extreme wash-out temperatures, these may be washed out anywhere from 60° to 104°F. However, temperature on the lower end will prolong wash-out time in detailed areas of the stencil. With any stencil, it's tempting to use water force to speed up wash out. Though resistant to water, the exposed stencil is still somewhat soft. Image edges can be damaged with high wash-out pressure, especially if the hose nozzle is held too close to the stencil surface. A directional-type nozzle that can concentrate water into a thin stream may make that temptation irresistible. Remove the temptation by installing a water-hose nozzle with a fine, widely diffused spray pattern. Wash-out time is also a factor: wash-out should continue until image areas are cleared of emulsion and the dissolved emulsion has been rinsed away from both sides of the screen to prevent scumming. Scumming occurs on poorly rinsed screens, when un-rinsed emulsion flows back into image areas, especially of fine details, and dries. It forms a thin, transparent film that can bridge mesh openings and block ink passages, but may appear open upon casual inspection. Therefore, screens should be checked during the rinse (remaining emulsion will make the surface feel slimy) and visually inspected with care when dry. Future developments Because the stencil is such a key process component, it's no surprise that considerable research and development is focused on its improvement, particularly in the areas of faster exposure speed and higher resolution. Manufacturers also hold out hope for that ideal multi-purpose emulsion suitable for use with all inks and applications. Such research should, of course, continue. Today's high-resolution SBQ photopolymer emulsions offer rapid exposure, yet have some limitations with water-based inks at present, particularly for reclaimability. Similarly, dual-cure systems offer wider ink-system compatibility and easier reclaim, but are slower to expose and can't reach photopolymer resolution. Beyond stencil technology, a host of innovations in exposure hardware leaves little doubt about the direction of future machine technology. Direct digital stencil imaging, exposure by direct projection or laser, and "blanketless" exposure units requiring no delay for draw-down are among the notable new technologies already on the market. Exciting as such developments are, the most important goal for the last half of this decade should be neither the perfect stencil nor high-tech stencil-processing gear. Instead, more immediate goals should be better training and a more disciplined approach to managing stencil variables using the technology now available. Ultimately, no technology can overcome a "corner-cutting" attitude. For many screen makers, the real challenge for tomorrow is to answer the same practical question we face today and confronted yesterday: If you can't afford to invest the time and effort necessary to make the screen right in the first place, where will you find the time and money to waste, remaking it when it fails? |
1997 National Business Media, Inc.