Printer's Guidebook, Part IX
Blades, continued
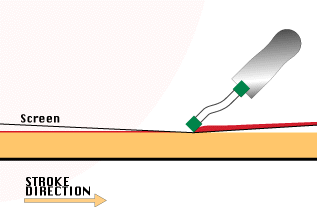
33. Blade pressure
That force necessary to overcome screen tension and off-contact, then to
transfer ink.
The primary job of the printing blade is to overcome mesh tension and off-contact distance (see variables 11: MESH TENSION and 42: OFF-CONTACT) and bring the stencil in momentary contact with the substrate. Off-contact is important because the mesh must pull itself out of the ink film (don't let your arms or press do it). The mesh tension contributes to this off-contact by creating resistance which is necessary in order to have blade pressure. You can't have a transfer of energy (or ink) unless you have such resistance. If the blade does this job first, it can then wipe the ink across the screen, shearing it through the mesh and onto the substrate. Like passing food through prison bars, your blade never touches the substrate. It takes a combination of forces, mesh parameters (such as mesh count and percentage of open area) and blade angle, to get ink to behave. Skimpy pressure will result in little or no ink transfer. Because this is an abhorrent outcome for a self-respecting screen printer (and because there is little or no feedback on blade pressure), printers often conclude that more is better. Unfortunately, it isn't pressure that actually increases the deposit, but the extra angle of attack we can't see under the ink roll. Pressure simply bends the blade as it touches the press bed, compresses the substrate, drives ink into the shirt (increasing the ink bill), distorts the image and undermines registration. Excessive pressure will damage polyurethene blade material by taking it beyond its yield point and also causes excessive wear on the mesh, stencil and manual printer's arms.
Screen tension and off-contact both must be overcome by squeegee-blade
pressure prior to the transfer of ink.
In the words of Robert Browning: "Less is more." To determine correct blade pressure, start by backing off your pressure adjustment (or, if manual, your elbow grease) until the image won't print. Then increase the pressure by slight increments until you get a satisfactory print. On a manual press, you must feel and judge the pressure with your arms. If you can feel the platen beneath your stroke, you have gone too far and are bending the blade with the press, crushing the shirt like a vise. On an automatic, you still shouldn't crush the shirt between the blade and the platen, but you can't feel anything so you have to watch for signs of too much pressure. Look for excessive blade bending, ink on the inside of the shirt, ink on the platen. (How much do you charge for ink on the inside of the shirt or on the platen?). Ideal pressure is a battle of resistance between the blade and the mesh-the poor ink gets caught between these Titans. The unsuspecting shirt should only feel the tiny touch of a gentle kiss that deposits ink on its surface. The battle between these fighting forces is called interface pressure (a phenomenon you can see demonstrated everywhere in life, from the way you lay on a bed to how your tires stay on the road). Although numerous printers may resort to the technique, adjusting image opacity (ink thickness) or clarity by varying the blade pressure is not recommended. If you need a different ink deposit, change your blade angle, mesh tension, mesh count and off-contact variables, then come back and re-adjust the blade pressure, as described above. Though we mention each of these factors individually in this Guidebook, they don't operate alone, but act in concert- each affects and is affected by the others. |
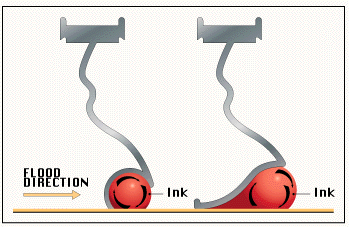
34. Floodbar edge shape
Affects both stencil wear and movement of ink across and into stencil.
The blade and floodbar work together to control the ink during the screen-printing process. The floodbar fills the openings in the mesh so the blade can transfer the ink through the mesh and onto the substrate more efficiently. A flood stroke also keeps ink from drying in the mesh openings of the stencil when solvent and water-based inks are used.
The importance of the floodbar is often overlooked in screen printing, but
it can do things for the finished print that the blade can't do, because
the flood stroke doesn't deflect the mesh like the blade stroke does.
Previously just flat, ink-pushing panels, new floodbar profiles
(such as these from Stretch Devices) bear out the floodbar's importance
to efficient ink transfer.
Shape Floodbars (on automatics) are commonly aluminum extrusions, about 1/8" thick. The most common shape is a rounded blade, set at a 0° angle. Pressure and angle of the flood stroke change the behavior of the ink, but the common use is simply to spread or scrape ink across the screen. A thin flood is essential when printing fine-line or halftone images, to control dot gain. Floodbar edges are often rounded, to minimize stencil and screen-fabric wear or damage. A rounded floodbar can act much the same as a rounded blade, as it forces more ink not only ahead of itself, but through image areas and even onto the substrate. This may be desirable for heavy ink coverage, but it can also cause problems such as dot gain when printing halftones. New floodbar shapes (see illustration above) have been introduced that, in fact, force the ink into the mesh by rolling it in front of the floodbar at high speed. In such applications, because the floodbar has done its job, the blade can stroke faster because it doesn't have to wait as long for the ink to travel through the mesh. Carding the ink It is very frustrating to have to scrape ink back into the center of the screen as you print. It is natural for the ink to spread sideways, though, as the blade and floodbar push it back and forth. Some printers have had success curving their aluminum floodbars on a smooth, round, 12"-diameter pipe using a small hammer (like a jeweler or a precision blacksmith). Be careful not to dent or bend the corners too much or they will break. (One press manufacturer actually sells clip on "wing tips" for their floodbars to turn the ink back as it tries to escape.) |
35. Floodbar angle
Determines the extent to which the flood stroke causes ink-into-stencil
penetration.
Adjustment of floodbar angle is possible on the higher quality automatic presses. This allows any angle to be set as needed (as well as the use of a single floodbar, rather than a set of variously angled bars). Additionally, floodbars are now available with certain built-in angles. By changing the type of floodbar, the angle is changed, even if your press does not feature a floodbar-angle adjustment. Some floodbars even eliminate the angle consideration because they inject the ink into the mesh openings by tumbling it at high speed in front of themselves. This is often beneficial when printing reverses, heavy coverage jobs or an overall heavy ink deposit. By placing the most common floodbar shape (rounded) at a 0° angle to the screen mesh, the ink is pushed across the screen; floodbar pressure determines how much ink covers the screen, to await the squeegee blade. This type of spreading relies on gravity to fill the mesh openings (which are sometimes twice as deep as they are wide), whereas angling the floodbar at 15-45° scrapes the ink rather than spreading it across the screen. This inhibits ink from penetrating the mesh openings and reduces deposit without effecting blade pressure. This is recommended for fine-line work or halftones. |
36. Floodbar stroke speed
A fast flood stroke deposits less ink; a slow stroke deposits more.
With a typical ink, less is deposited with a fast flood stroke, more with a slow (both relative to ink viscosity). If the viscosity is high (thicker ink), flood speed will not have as much affect on ink deposit because a thick ink needs more time to react and flow through the mesh. The flood-stroke speed will reduce the ink viscosity (resistance to flow), as the ink tumbles before the floodbar, helping to transfer it through the mesh. With a lower-viscosity ink-particularly true of some water-based products-the affect will be more significant, as the ink will move much more easily while waiting for the blade. Too much speed will reduce the amount of ink load in the mesh (and could also cause splashes). Automatic presses typically use a metal floodbar that travels behind the squeegee blade. Newer models have the ability to stop at any point in the cycle to suit your job requirements. For example, if you need to keep the screen flooded when using air-dry inks, the stroke cycle can stop just after the flood, rather than after the blade stroke. If you are printing plastisol, it can be adjusted to stop after the print stroke. Manual presses use the squeegee blade for the flood stroke. When the screen is in a partially up position, push the blade back without changing your hand position from the print stroke. This will drive ink into the mesh as well as push it back to the start of your stroke. Make sure you have enough space at either end of the screen for an ink reservoir. Whatever means you use to flood can also affect your print. Printing manually, your arms can get tired and forget how much pressure to apply-not good for day-to-day repeatability. Air cylinders on automatics can have problems starting and stopping smoothly and are difficult to calibrate for repeatable speeds from job to job. Direct-current (DC) electric motors can better control start/stop acceleration and provide a smooth, even stroke. The electric voltage into the motor is easy to regulate, but such a system is more expensive than an air system. |
37. Floodbar pressure
Won't affect registration; will affect ink deposit.
Unlike the registration problems that can occur with excessive blade pressure, floodbar pressure will not have an adverse affect on registration regardless of its setting. This is because floodbar contact occurs while the screen is in a raised position, away from the substrate. Floodbar pressure should not be adjusted indiscriminately, though, since too much pressure combined with angle and speed can push too much ink through screen openings, allowing it to seep onto the screen bottom. This will cause ink to print in non-image areas and dot gain to occur when printing halftones.
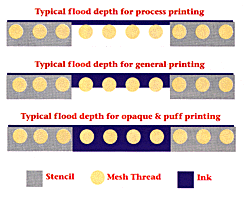
The chart at right reveals the importance of the flood stroke as not just a means of distributing ink across the screen, but into it as well.
The "irresistible force" of the floodbar-which acts like the stiffest blade you can buy-isn't phased by the "immoveable object" of even the thickest of inks. This considerably enhances the shear the ink by tumbling and rolling it in front of the unforgiving floodbar (see Variable 34: FLOODBAR EDGE SHAPE). Plastisol inks are very shear-sensitive and, as you tumble them, the internal friction and heat reduce their viscosity (resistance to flow). Instead of using reducers to increase flow, stirring and tumbling the ink with the flood stroke will help if flow. Don't jump to the conclusion (as some printers do) that you have nicks on the floodbar if your mesh tears. Floodbar nicks are often blamed as the cause of torn screens that have actually been unduly stressed at the floodbar ends. The print blade can bend as it pushes against the resistance of the screen, but the floodbar cannot. Consequently, it raises the tension of the mesh beyond the breaking point, even though the middle is fine. All blades-and especially floodbars-should be at least four inches from the inner edge of the frame to minimize the deflection and stress on the mesh. If you can, try to use floodbars and blades that are only one inch wider than the design. Nicks can still be a problem. Before you load a floodbar, run your finger along the edge and use fine emery paper to polish away any nicks. If a nick or dent is too severe to repair in this way and the leading edge is not perfectly straight, it's time to recycle that bar by cutting it into two smaller ones, discarding the nick in the process. |
1996 National Business Media, Inc.